

Email is still a valuable marketing channel, but most companies struggle with lists that aren’t performing as well as they would like. Often this is because the list is full of contacts that are several years old and have stopped engaging with emails. Conducting a re-engagement campaign is an easy and important way to keep your list clean and improve the performance of your email activity.
In this article, I’ll walk you through the steps of identifying when you need a re-engagement campaign and how to execute it using an example from one of Gladiator’s former clients.
Step 1: Evaluate the Baseline
I downloaded all of the client’s reports from MailChimp and calculated average bounce, open, and click rates for the current year and across all time. This showed me where we were starting out.
I noticed that both soft and hard bounce rates were well above MailChimp’s industry averages. Soft bounces indicate that the email could not go through due to a temporary reason, like server downtime, message size, or a full inbox. Hard bounces, on the other hand, occur when an email can’t be delivered due to a permanent issue, such as the email no longer exists.
Most hard bounces will be cleaned off the list immediately, while addresses usually have to hit a certain number of soft bounces before they are removed. In the case of MailChimp, it’s five. So MailChimp will take actions that should decrease bounce rates over time, but in the meantime, those high bounce rates could be pulling down inbox delivery.
The client’s open rates were well below industry average, showing that they had a lot of unengaged contacts on the list. Now you might think “What does it hurt to keep sending to people if they’re not opening? Maybe they’ll open eventually.” But most ESP (email service provider) algorithms heavily weight engagement (opens and clicks) in determining what to put in the inbox and what to send to spam. So having a lot of unengaged members on the list could mean that a significant portion of your audience isn’t seeing your emails at all!
The client had a decent click rate, which meant that even though a lot of their email content wasn’t getting seen, the contacts who opened the emails were highly engaged. Imagine what could happen if more of their emails were opened!
Step 2: Identify Key Areas for Improvement
So this client had two key areas of concern: Low open rates and High bounce rates.
These were both likely driven by the same set of underlying factors. While the list included thousands of contacts, many of them were several years old and hadn’t engaged with any recent emails. Many of these contacts had probably changed companies and were no longer using the email addresses on file, driving up the bounce rates. The high number of bounces and unengaged subscribers was telling ESP’s that these were not good emails, making it harder for the rest of the email list to engage.
Step 3: Make a Plan
To tackle the heart of these problems, we embarked on a re-engagement and list cleaning campaign.
Identify the Inactives
We started by identifying the inactive contacts we wanted to target. We decided to send the re-engagement campaign to contacts that had not opened any of the emails in the last three months. Since the client had sent several emails in the last month promoting a webinar, we defined the segment by a time period (three months) instead of a specific number of emails to ensure that we had a wide enough range.
If your sending schedule is more spread out, you may want to select contacts that haven’t opened the last 5 emails to give you a broader time frame than 3 months. Targeting contacts that have not opened in the last 3-6 months is a good place to start, so keep that in mind when you are defining your Inactive segment.
Plan Your Efforts
Next we planned the email sequence to send to this Inactive segment. Here are some questions to ask when you are planning your sequence:
- How many emails will be sent?
- How far apart do we space them?
- What is the approach for each email?
- What can we use to entice someone to engage?
- What happens after each email in the sequence?
- When are names moved back on to the Active list and when are they cleaned off the list for good?
We decided to send two efforts spaced about 30 days apart. This timing was a little bit farther apart than is typical, but there were also non-re engagement emails sent to the audience during this time. If they clicked on any of them, they were added back into the Active segment of the list.
In general, you should base the timing of your re-engagement efforts on your typical email frequency. If you send emails once a week or more, then you can space your emails 3-7 days apart, and you’ll want to make sure that the entire sequence takes at least one week so names are not cleaned off too quickly. If you typically email your list monthly, then you can space your emails 10-15 days apart. These are just guidelines to start with. Once you have a re-engagement campaign established, you can test effort timing to determine the best cadence for your list.
Step 4: Execute
This client had just released a new white paper, which created the perfect hook for the first re-engagement email. 1) It was valuable, 2) it was something they hadn’t seen before, and 3) they needed to take action to get it (triggering engagement).
Re-Engagement Email #1: Your White Paper Enclosed

The first re-engagement email focused on the new white paper and contacts were able to get it just by clicking. If they clicked to read the white paper, then this triggered MailChimp to remove them from the Inactive segment and add them back into the regular list.
Anyone who didn’t click on this first re-engagement email was sent another re-engagement message 30 days later.
Re-Engagement Email #2: Is This the End?
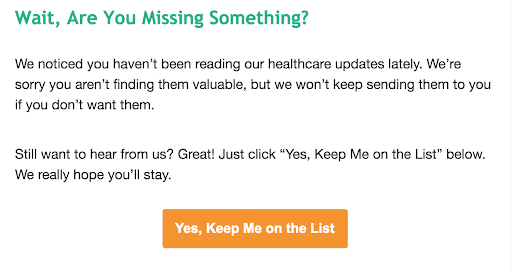
The second email asked contacts directly if they wanted to stay on the list. This was the last email of the series, so if the contact didn’t click on this email then they were automatically cleaned off the list.
Step 5: Evaluate Results
We started with a segment of more than 9,000 contacts that had not opened a single email from us in the past three months. Many of these contacts had not been active for a year or more.
624 of these contacts (or 6.9%) were added back to the main list. The rest were removed.
Take a look at how engagement improved after removing the dead weight:
| Before Cleaning | After Cleaning | |
| Open Rate | 7.74% | 28.89% |
| Click Rate | 2.82% | 8.46% |
The client went from having an abysmal open rate and respectable click rate to having both open and click rates well above industry averages. This will land their emails in more inboxes, which will put them in front of prime prospects that were not seeing their emails.
Step 6: Automate and Test with Accountability
So what happens after you clean your list? You can just leave it alone for a couple years, right?
Wrong.
Once you have established a re-engagement campaign that engages 5% or more of your inactive contacts, then you can set it to run automatically anytime a contact has been inactive for three months or more. Simply take the re-engagement campaign you used and set it up as an automated series in your email tool of choice.
You will need to check the performance of this campaign at least once per month to make sure that it continues to perform. Even better, set up A/B tests within your automated series to find what works the best. Either way, don’t just set it and forget it.
Establishing a successful automated re-engagement campaign is a great way to keep your list healthy and get the most out of your email marketing activity. If you would like help with your email program, please contact us.